
Clarity is a place to read, write and organise Markdown on your Mac. Start with one document, or bring a folder of existing files into the sidebar. Your documents remain ordinary Markdown files in Finder.
This guide describes Clarity 1.0.0 for Mac. The pictures use a fictional Harbour study. The website demo lets you try selected features with sample documents; its edits reset when you reload the page.
Get started
Create your first document
- Choose File → New Document…, press ⌘N, or click the square-and-pencil button at the bottom of the sidebar. An empty workspace also offers Create new document.
- Give the document a name and choose its Finder location in the save dialog.
- Click Create, then click in the document and start writing. Cancelling the dialog creates nothing.
Open a file you already have
Choose File → Open Documents… or press ⌘O. Select one or more .md or .markdown files. Clarity opens them in their existing locations.
Start a project folder
- Click the folder-plus button at the bottom of the sidebar and choose Create new folder…. The same action is available as File → New Folder….
- Name the folder and choose its location. A project is a Finder folder shown as a group in Clarity.
- Hover over the new project in the sidebar and click its + button to create a document there.
Bring in an existing folder
Use the folder-plus button and choose Import from Finder…, then select your folder. Clarity lists its supported Markdown documents without moving them. You can also choose File → Import Folder from Finder…. Click a document in the sidebar to read it.
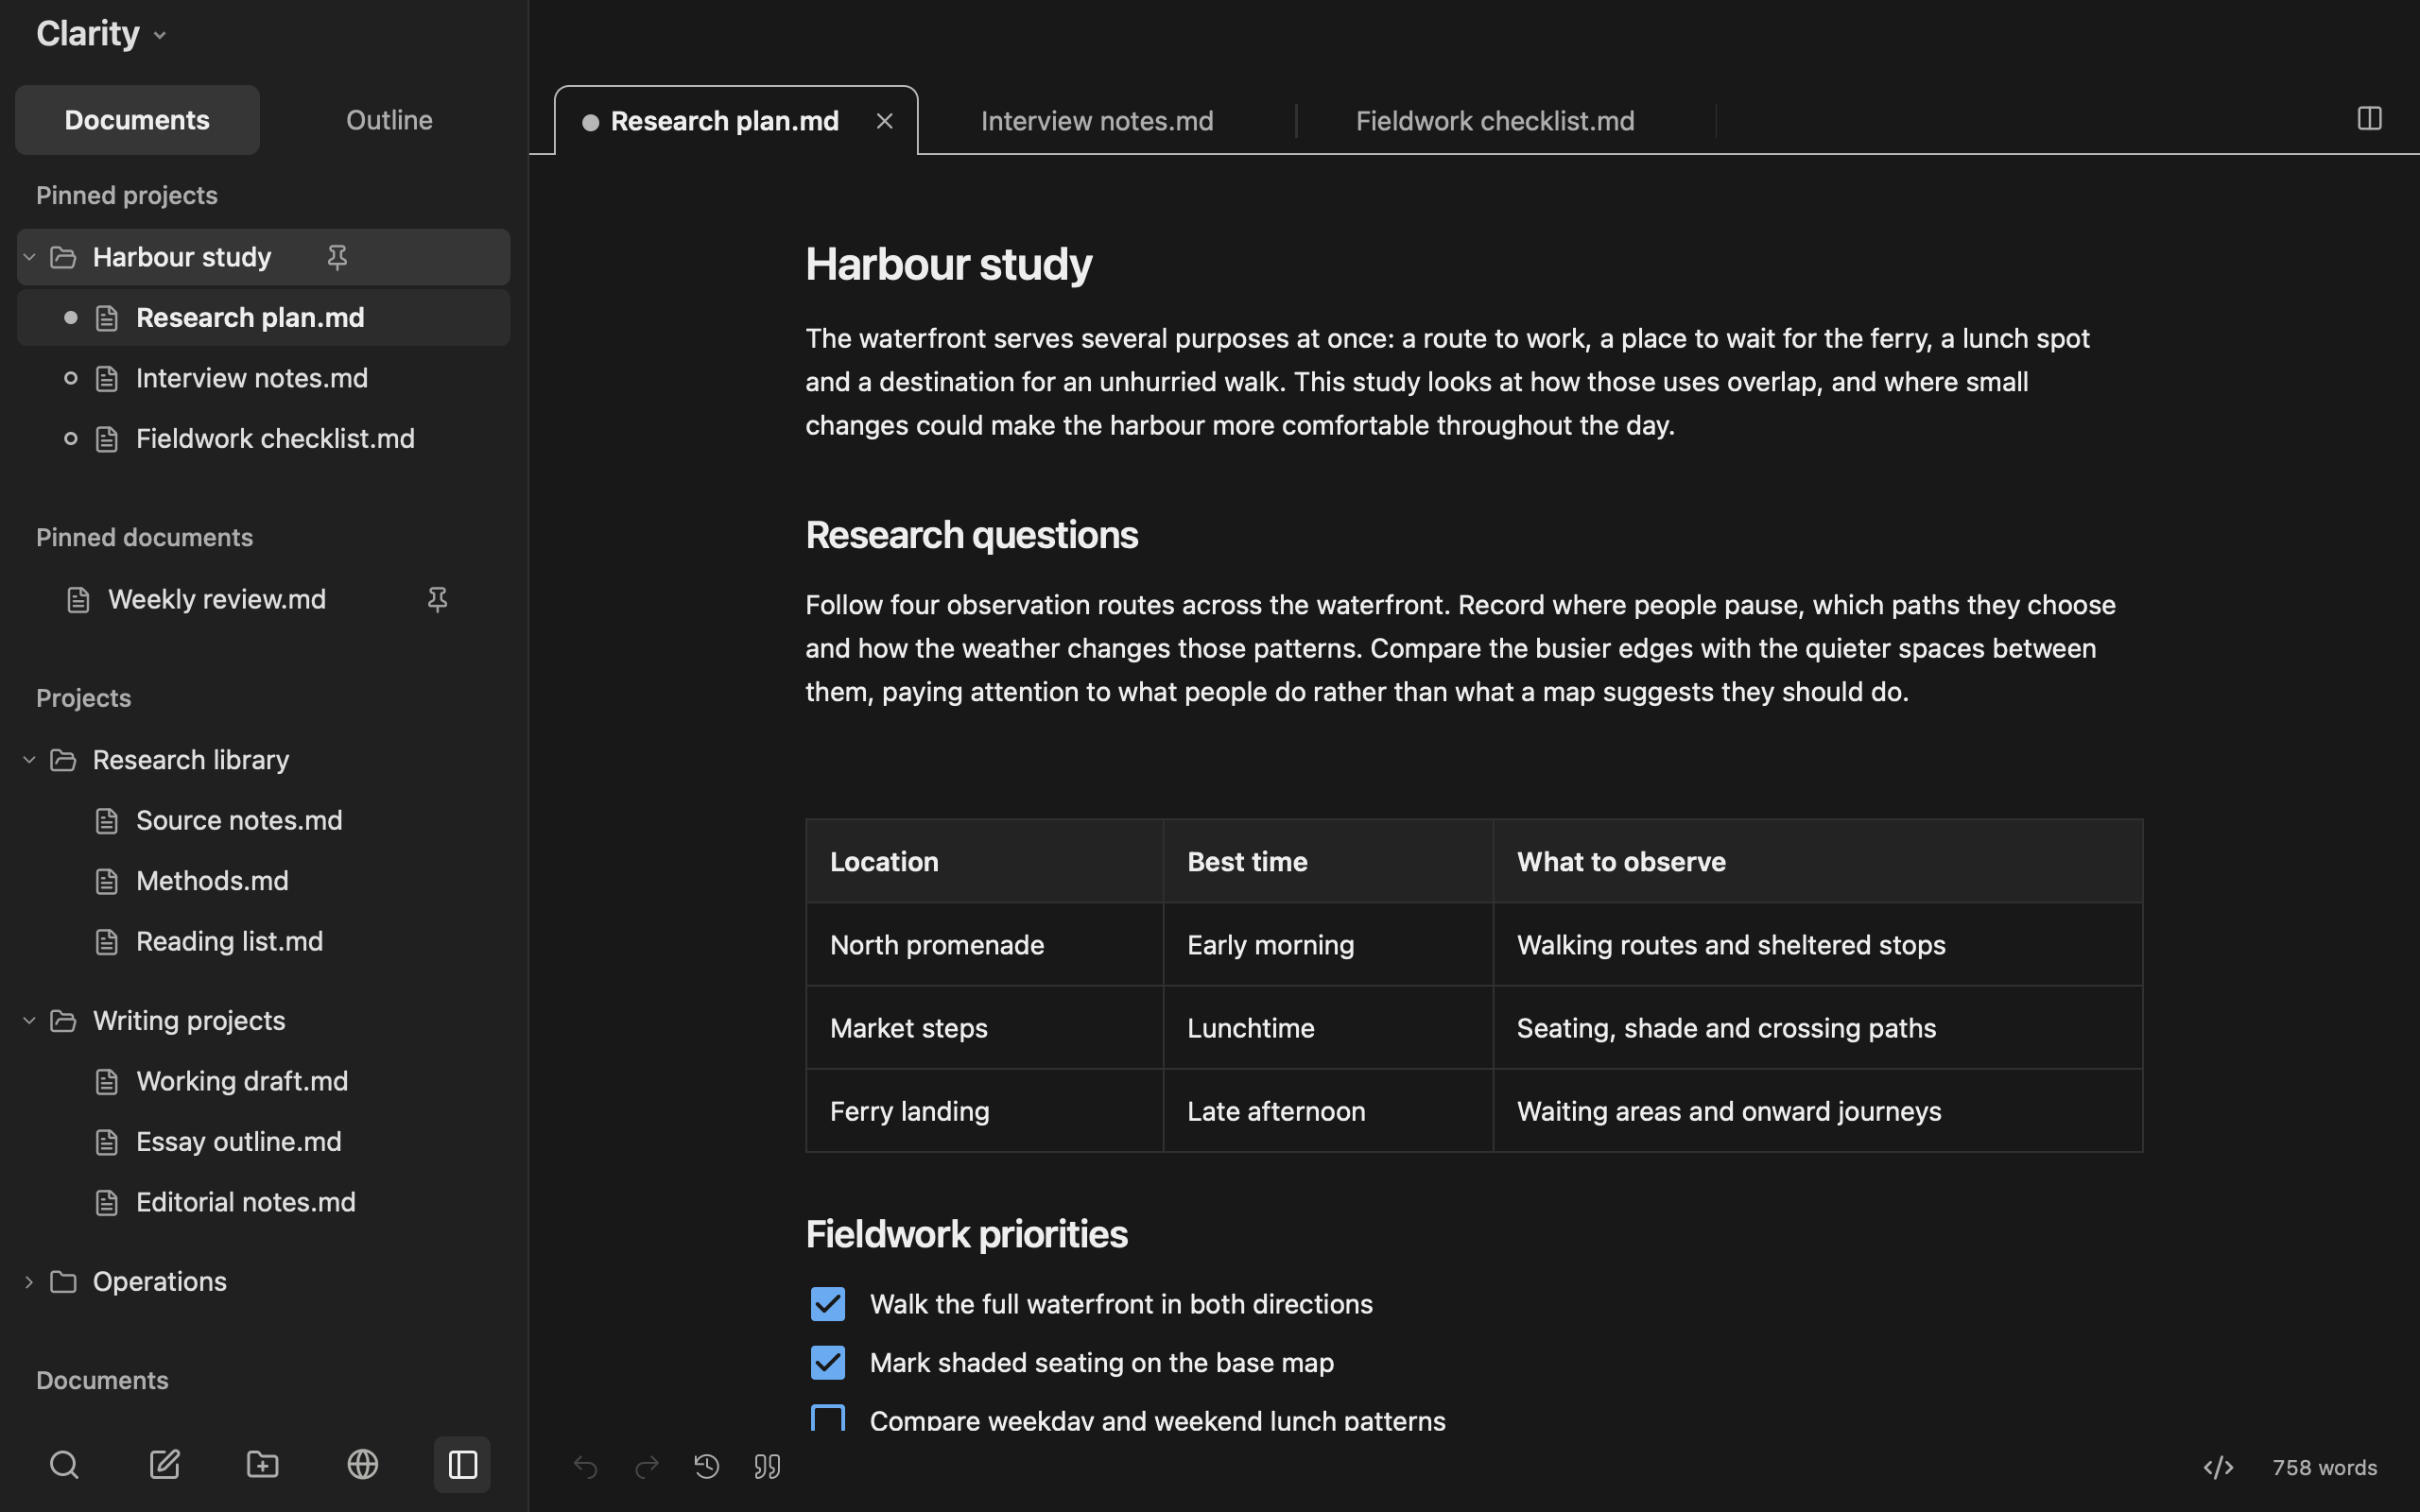
Organise projects and files
Use a project for related documents. A standalone document still has a normal Finder location; it appears outside the project groups.
- Add a document to a project: hover over its folder row, click +, enter a name and confirm.
- Keep favourites close: open the project or document’s More menu and use its pin action. Pinned projects appear before pinned documents. Drag to reorder within either group.
- Collapse a project: click the arrow beside its name. Clarity remembers your expansion choices.
- Rename a document: double-click its tab name, or right-click the tab and choose Rename…. A focused tab also supports F2.
- Move a file: dragging a document onto a folder can move the actual file. Read the drop message to distinguish moving a file, reordering the sidebar and opening a tab.
Remove from Sidebar leaves a project’s Finder files in place. Delete Project… moves the whole project folder to Trash, including files Clarity does not list. Delete Document… deletes a file; closing its tab does not. Read the confirmation before deleting.
Write and format Markdown
Click in the document to write. Headings, lists and other formatting appear as part of the document while the saved file remains Markdown.
- Place the text cursor in a paragraph, or select the words you want to change.
- Use Format in the Mac menu bar for headings, bold, italic, strikethrough, inline code, quotes and lists.
- You can also right-click in the editor, or press Shift-F10, to open formatting actions near your text.
Use Markdown as you type
| Type at the start | Result |
|---|---|
#, then Space | A main heading |
##, then Space | A second-level heading |
-, then Space | A bullet list |
1., then Space | A numbered list |
[ ], then Space | An unchecked task |
Continue or leave a list
Return starts the next item. On an empty item, press Return again to leave the list; a nested list moves out one level first. Tab indents an item and Shift-Tab moves it back. Shift-Return adds a line break within the same item. A new item after a completed task starts unchecked.
Check the underlying Markdown
Click </> at the bottom right of the pane, or choose View → Show Markdown Syntax. This source view is read-only. Use the same control to return to formatted writing. Click the word count beside it for document statistics.
The bottom Undo and Redo arrows affect the document above them. ⌘Z and ⇧⌘Z follow the document or text field you are currently editing. In a code block, Return continues the code; ⌘Return starts a paragraph below it.
Add tables, links and images
Insert and edit a table
- Place the cursor where the table belongs and choose Format → Insert Table…, or press ⇧⌘T.
- Choose the number of rows and columns. The row count includes the header row.
- Click a cell to write. Tab moves forward, Shift-Tab moves back, and Tab in the final cell adds a row.
Click inside a table to reveal Row +, Column + and additional table actions. ⌘Return adds a row below; Shift-Return leaves the table and starts a paragraph. Markdown table cells contain a single line of text.
Make a link
Select the words to link, choose Format → Link… or press ⌘K, enter the address and confirm. The address can be a website or a relative document path, such as ./Research%20plan.md.
Insert a local image
- Place the cursor at the insertion point.
- Choose Format → Insert Image… or press ⇧⌘I, then select the image. Pasting or dropping a local image also imports it.
- Keep the document’s sibling
.clarity-assetsfolder with the Markdown file when moving it in Finder.
For sharing, Export copies available linked local images with the Markdown. History records image references, not earlier copies of the image files themselves.
Use tabs and split view
A single sidebar click opens a browsing tab. Clicking another document replaces that browsing tab. Choose Keep open, double-click the document’s sidebar entry, or press ⇧⌘K to keep it. Editing keeps the tab open too.
Read two documents together
- Click the split-screen button at the top right of the workspace.
- Drag a sidebar document or an existing tab into the empty pane. Alternatively, click Drag and drop document, then choose a document from the sidebar.
- Read or edit in either pane. Each has its own tabs, scrolling and bottom controls. Use the split-screen button again to return to one pane.

The same document has one editor. An ordinary sidebar click returns to its existing tab; dragging it into another pane moves that tab. Dragging into a pane does not move the file in Finder.
Close a tab with its × or ⌘W. Right-click a tab, or focus its name and press Shift-F10, for its actions. When Clarity restarts, available tabs, pane selections and saved reading positions return.
Navigate with Outline and search
Jump between headings
- Click the document you want to navigate.
- Choose Outline above the sidebar, or press ⌃⌘O.
- Click a heading to bring that section into view. Add headings to the document to give Outline more places to navigate.
In split view, clicking or scrolling in a pane makes Outline follow that document. Its name appears at the top of Outline with a solid circle. Scrolling the other pane does not move your typing cursor; typing makes Outline follow the document you are editing again.
Find a document or a phrase
- Click the magnifying glass at the bottom of the sidebar, or press ⇧⌘F.
- Type part of a document name or its text.
- Choose a result to open its source. Search covers documents registered in Clarity.
Selecting a tab reveals its document in the Documents sidebar. In split view, a project name in the breadcrumb also takes you back to that project. Use the bottom sidebar toggle or ⌃⌘S to show or hide the sidebar.
Keep notes beside a document
Use Notes for a reminder, question or reading comment that belongs with a document without becoming part of its body.
- Open the document and click its Notes icon beside the History clock at the bottom of the pane.
- Type in the box below the document. Notes save automatically, so there is no separate Add or Save button.
- Continue reading above, or switch documents. Each document keeps its own note text.

Write ordinary text or Markdown such as **bold**, - a list item or - [ ] a task. The box displays the Markdown as text. ⌘Z works while typing in it.
Drag the diagonal lines in the box’s upper-right corner to resize it. Click that control to expand or restore the box; you can also reach it with Tab and press Space. Click the highlighted Notes icon to hide the box. Clear its text to remove a note.
Notes are ordinary Markdown files stored separately on this Mac. Copying only the document in Finder does not carry its notes. Use Export with Include notes to take them with you, and back up your notes as well as your documents.
Renaming or moving through Clarity keeps notes attached. Save As and Duplicate make independent copies. If an outside change prevents a note from saving, Clarity keeps your writing; Keep a copy saves it separately. A note can hold up to 128 KB of text; use another document for longer writing.
Compare and restore with History
Undo handles recent edits in the current editing session. History keeps captured versions that you can revisit after reopening a document.
- Click the clock icon at the bottom of the document’s pane.
- Choose a saved version on the left. Current document includes the current capture of unsaved writing.
- Use Changes to compare it with the current capture, or Version to read the selected version’s complete Markdown.
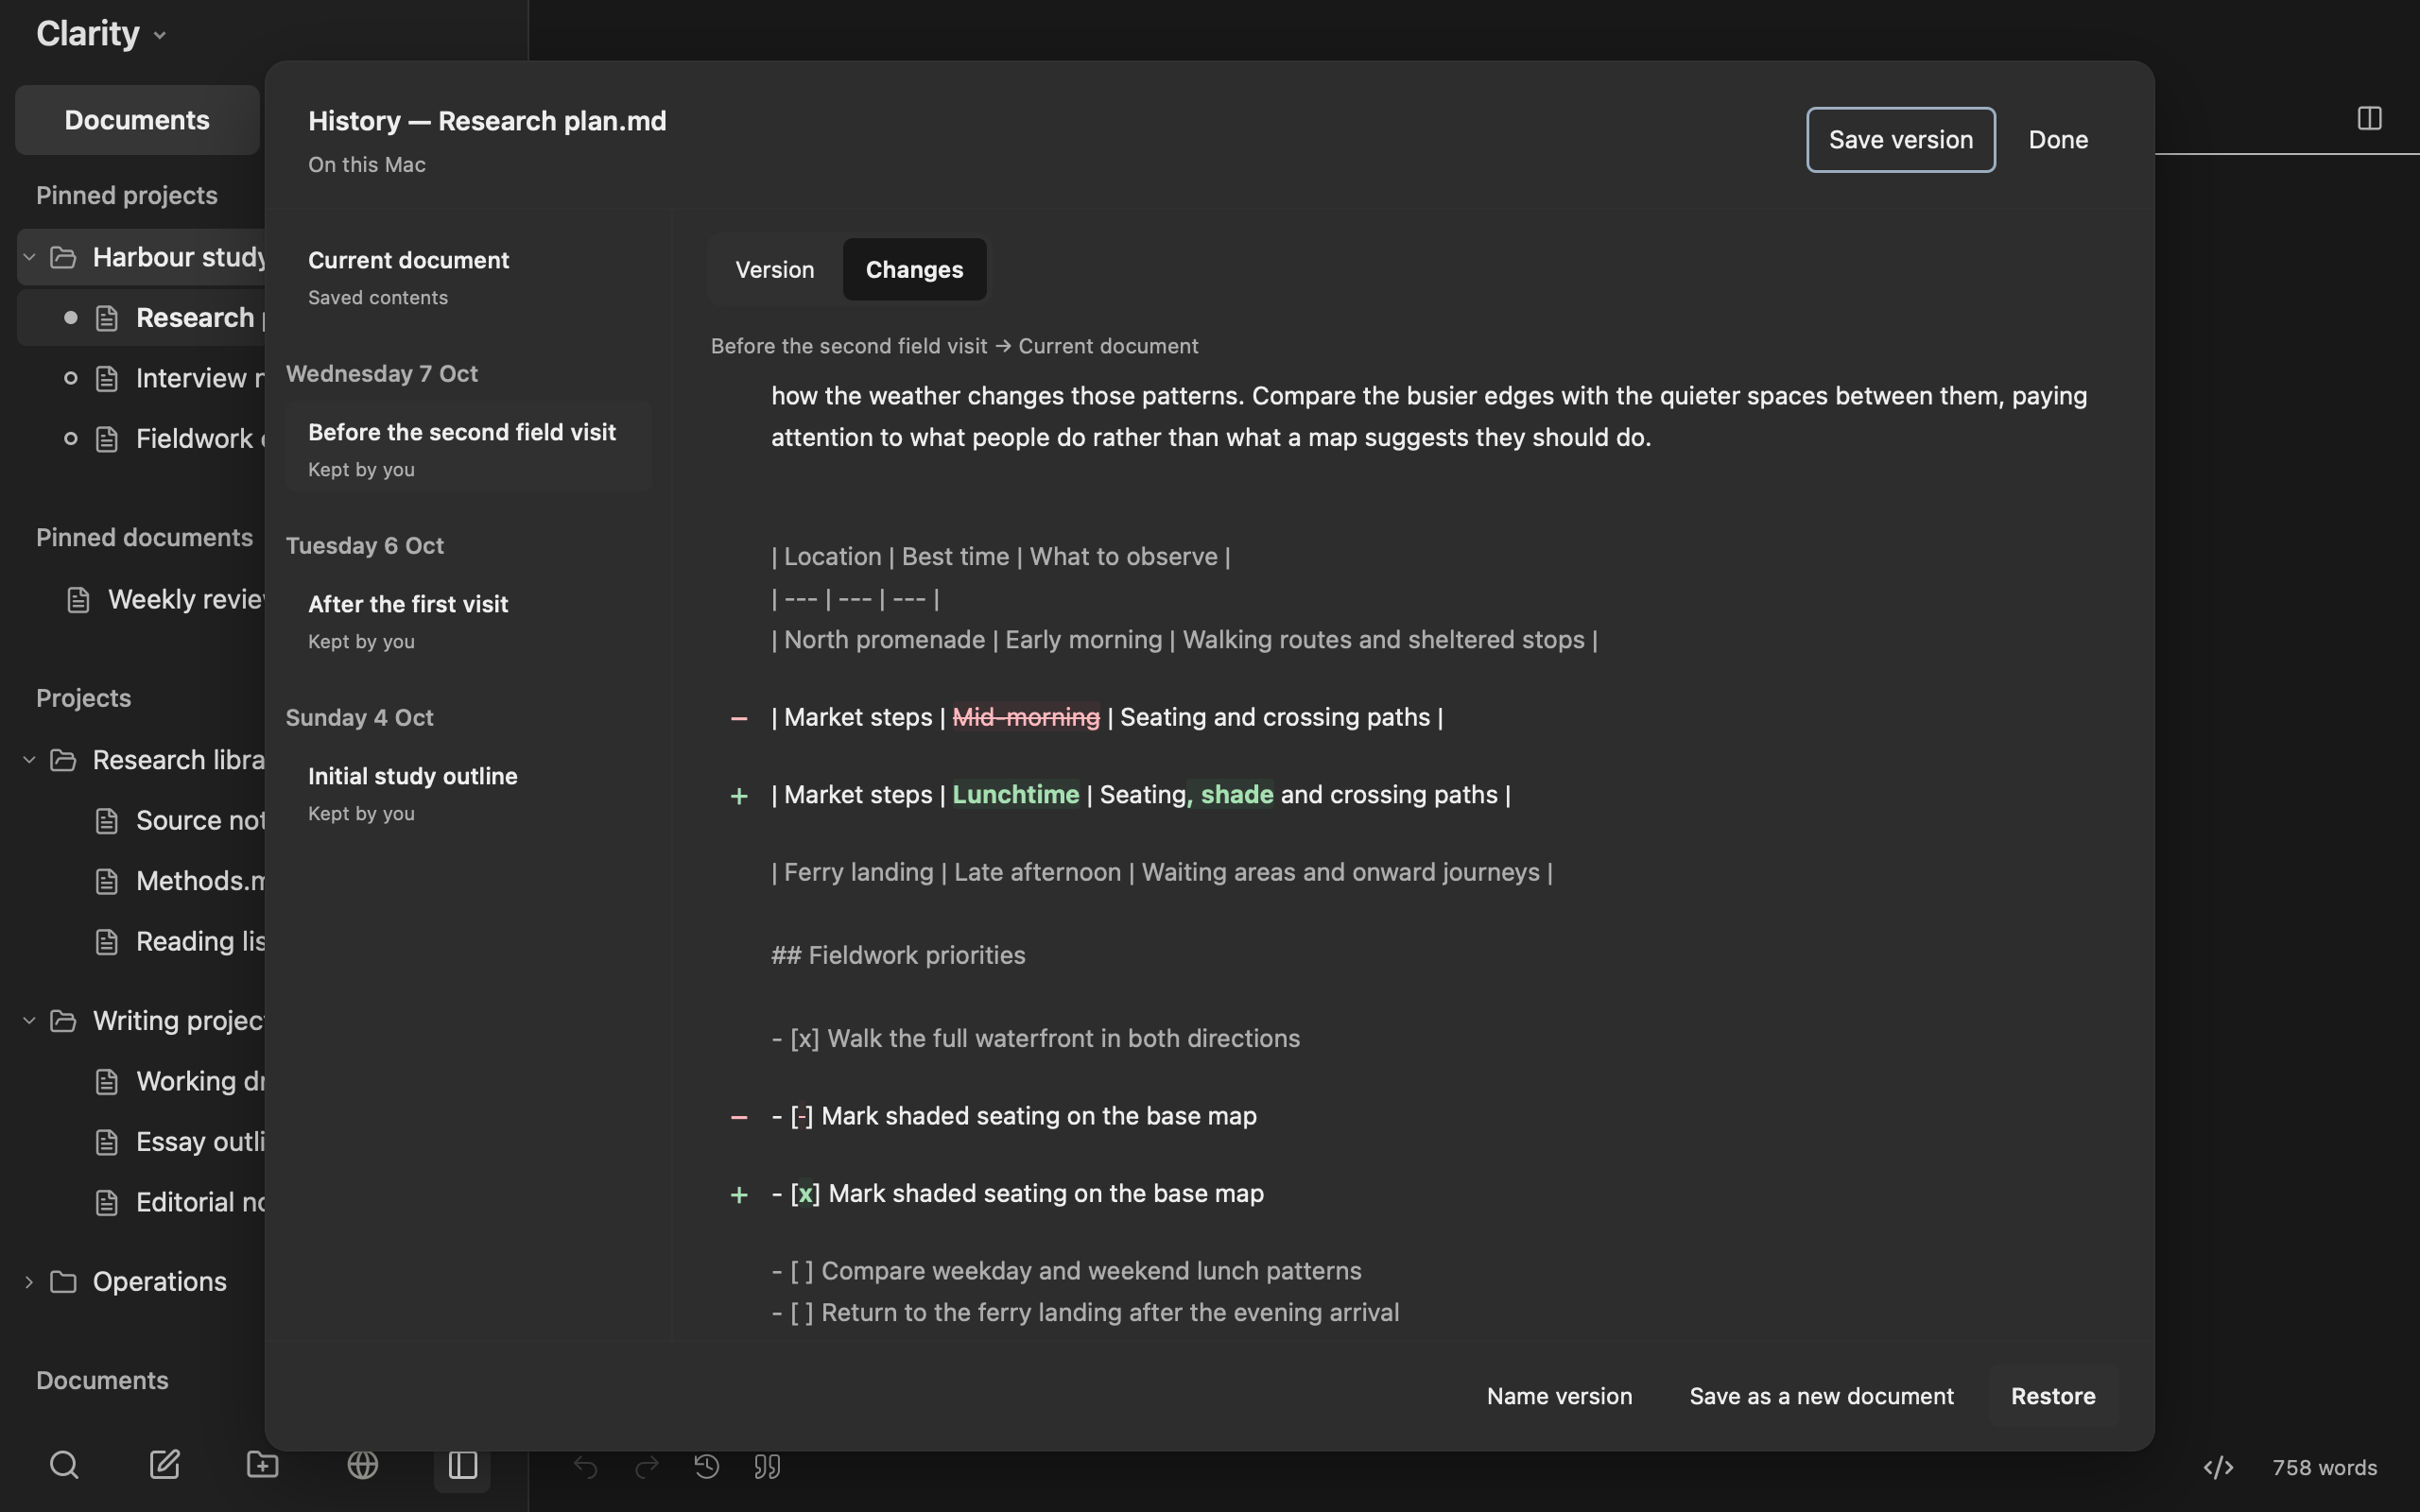
- Save version
- Keep a complete capture of the current contents, including unsaved writing. Give it an optional name.
- Name version
- Label an existing version and protect it from automatic cleanup.
- Restore
- Keep the current captured contents in History, then replace the working file with the selected version. This starts a fresh Undo session; use History to return to the previous contents.
- Save as a new document
- Create a separate file from the selected contents while leaving the original document in place.
Changes compares Markdown, including checkbox states, table cells and link or image addresses. It does not compare image pixels. Large comparisons may show complete changed sections instead of individual words. Expand unchanged sections when you need more context.
The comparison stays still while you read. If the source changes, use Refresh to capture it again. Click Done or press Escape to return to your document; let a save or restore finish first.
History is local to this Mac and contains versions Clarity has captured. Automatic versions have limited retention; versions you save or name are protected from automatic cleanup. Keep independent backups of your Markdown, images and other linked files.
Review tasks, references and notes
- For one project, hover over its sidebar row and click its globe. For the whole library, use the globe at the bottom of the sidebar.
- Choose Tasks, References or Notes.
- Search or sort the items, then follow an item’s source document to read it in context.

- Tasks gathers Markdown checkboxes from documents. Checking a task here updates the original document.
- References gathers links from documents so you can find their sources again.
- Notes gathers saved document notes. The global overview includes notes attached to standalone documents too.
Older imported note collections remain available as separate notes in Overview. Large note lists show 100 items at a time, while search checks the full saved note text. Allow a large project time to load; unavailable files are reported so you can see when an overview is incomplete.
Adjust appearance and spelling
Click Clarity above the sidebar’s Documents and Outline tabs to open everyday settings.
- Theme: choose Dark, Light or System. A new installation starts in Dark.
- Text size: adjust the reading and writing size without changing the document’s Markdown.
- Spelling language: use macOS detection or choose a dictionary. This changes spellchecking, not the interface language.
Choose All settings… or press ⌘, for the full settings window. Documentation in the same menu opens the bundled guide in a reading tab; it is also available through Help → Clarity Documentation.
Export, print and share
Export a document or project
- Right-click a document tab, or open a project’s More menu, and choose its Export… action. The File menu also offers Export Document… and Export Project….
- Choose a new folder name and location. Decide whether to Include notes; notes are included by default.
- Keep the resulting export folder together when sharing or moving it.
Export copies Markdown and available linked local images, leaving the originals in place. It captures the current text of open documents and saves Notes before preparing the export. It does not copy every unrelated file from a project folder or download web images and external references.
The hidden .clarity-notes folder and its mapping file reconnect exported notes when the folder is imported into Clarity. Import the complete export folder through Import from Finder…. Reimporting the same unchanged export does not add duplicate notes.
Print or save a PDF
- Choose File → Print… for the current document, or Print Project… for a project. Print is also available in the document and project menus.
- Choose whether to include notes.
- Use the standard Mac print dialog to print, or choose its PDF option to save a reading copy.
Each project document starts a new section. Print preserves readable text, tasks and tables; unsupported embedded HTML is shown as text. Unavailable local images or large selections may need restored file access or a smaller export.
History and recovery records stay on this Mac; they are not included in an export. A PDF is a reading copy. Keep the Markdown export and its assets when you want to continue editing elsewhere.
Save safely and handle a problem
Clarity saves changes automatically. Press ⌘S to request an immediate save. Normal tab closure and Quit finish pending saves or explain a problem while keeping recoverable work accessible.
If saving needs attention
Open the Save needs attention notice for details. Restore access to the file or its location as needed. History unavailable is a separate message: the document may have saved even when its History could not be recorded.
If another app changes the same file
- Clarity pauses writing over the file when there are competing unfinished edits.
- Open History and compare the captured versions.
- Choose Use external version to adopt the other contents, or Save my draft as a new document to keep your writing separately.
Clarity does not merge competing edits automatically. After an interruption, recovered drafts may reopen; review them and save the version you want. A missing document does not prevent other available tabs from reopening.
If a document opens as protected source
Some Markdown cannot be safely represented by the formatted editor. Clarity shows that content as protected source and leaves its original contents intact. Opening a file does not rewrite it.
Saved on this Mac describes the local file. Your file-sync service handles other devices. Keep independent backups of documents, local image folders and Clarity notes; History and recovery do not replace those backups.
Useful keyboard shortcuts
⌘ means Command, ⇧ means Shift and ⌃ means Control. Some Mac keyboards need Fn with a function key.
| Action | Shortcut |
|---|---|
| New document | ⌘N |
| Open documents | ⌘O |
| Save | ⌘S |
| Undo / Redo | ⌘Z / ⇧⌘Z |
| Bold / Italic / Inline code | ⌘B / ⌘I / ⌘E |
| Link | ⌘K |
| Insert table / Insert image | ⇧⌘T / ⇧⌘I |
| Keep the browsing tab open | ⇧⌘K |
| Close the current tab | ⌘W |
| Rename a focused tab | F2 |
| Open editor or focused-tab actions | Shift-F10 |
| Search Clarity | ⇧⌘F |
| Show or hide the sidebar | ⌃⌘S |
| Show Outline | ⌃⌘O |
| Show Markdown Syntax | ⌃⌘M |
| Print the document | ⌘P |
| Open settings | ⌘, |